 One of the major benefits of owning an Android phone is its flexibility. You’re not boxed into Apple’s heavily circumscribed walled garden. Your phone is part of a fairly wide-open ecosystem and you can have total administrative control to tinker with its powerful hardware and software. How? By rooting the phone to give yourself administrative root access.
The main hurdle for most users is the confusing technical process to go about rooting the phone. There are plenty of tutorials online, but most of them rely on jargon, use imprecise language, or skip steps while assuming the user is familiar with the nuts and bolts of what the author means. The purpose of this tutorial is to provide a clear, precise, plain-English procedure to beginners for rooting an Android phone. Please give me any feedback you have if a step should include clearer language or needs to be updated in any way.
I validated this tutorial with a Nexus 4 running Android 4.4.4 and a computer running 64-bit Windows 8.1. However, the same basic steps apply to Linux and Mac as well as other versions of Android and Android phones. Rooting your phone carries some risk. You may invalidate your warranty, and following the procedure incorrectly could render your phone inoperable. Nevertheless, it is a common process that has been done by many, many Android users. Follow this tutorial at your own risk (disclaimer: the author accepts no responsibility) and make sure you backup all of your data first. Let’s begin.
Set up Android Debug Bridge (ADB) on your computer
The first step is to install the Android SDK with its ADB tools onto the computer. This developer toolkit allows us to send commands from the computer to the phone.
- Download the Android SDK from here. You don’t need to download one of their bundles with an IDE like Eclipse or Android Studio. For this project you can just choose the option to get the SDK for an existing IDE.
- Install it on your computer somewhere like c:Androidandroid-sdk (adjust this path accordingly if you’re using a Mac or Linux).
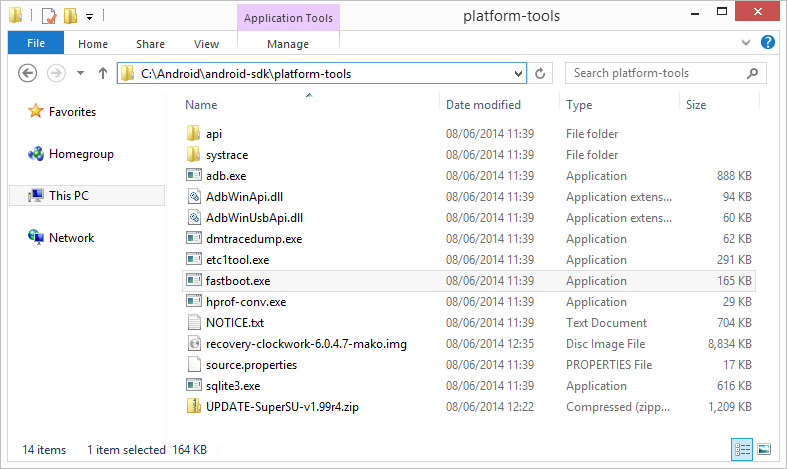
- Navigate to c:Androidandroid-sdkplatform-tools and verify that the file fastboot.exe is in there.
- Congratulations, you’ve set up ADB.
Enable USB debugging on the phone
Now that ADB is installed on the computer, we need to prepare the phone to receive its commands by enabling USB debugging.
- On the phone, navigate to Settings > About Phone > Build Number.
- Tap the build number seven times to become a developer.
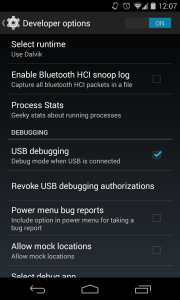
- Go back to settings. There is a new menu item called Developer Options. Open it, find USB Debugging, and check it to enable it.
- Plug the phone into the computer via USB.
Unlock the phone’s bootloader
ADB is installed on the computer, the phone has USB debugging turned on, and it is connected to the computer via a USB cable. We’re ready to unlock the phone’s bootloader. Doing so will allow us to install the rooting tools in subsequent steps.
- Navigate to the computer’s Control Panel > Device Manager (you don’t need to follow these steps to install drivers on a Mac or Linux – skip to step 4, below).
- Find the phone in the list of devices. It may appear alphabetically in the list, or under “other devices.”
- Right-click the phone and choose “update driver software.” If prompted, choose to “install from disk” and browse to c:Androidandroid-sdk as the location.
- On the computer, navigate to the c:Androidandroid-sdkplatform-tools folder. Right click inside the folder and choose “Open command window here”
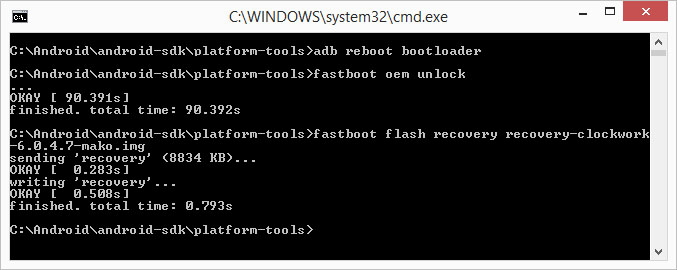
- At the command prompt, run: adb reboot bootloader
- Your phone should reboot into a screen showing a green android with his chest open. At the command prompt, run: fastboot oem unlock
- Your phone should ask if you want to unlock it. Select “yes” using the up/down volume keys to navigate and the power button to select.
- Using the volume keys, navigate to the “recovery mode” option and use the power button to select it.
- You should see a screen with another android. Or, hold down both volume buttons and the power button all at the same time to boot into recovery mode.
- Select “factory reset” and let the process run for a few minutes. Once finished, select “reboot” if prompted.
- Congratulations, your bootloader is now unlocked.
Install CWM recovery
Now that the bootloader is unlocked, we can install a tool called ClockworkMod (CWM) which will in turn allow us to install the rooting tool next.
- Download the SuperSU ZIP file from here or here.
- Open the computer’s file explorer, navigate to your phone, and move the SuperSU.zip file to a folder on your phone.
- Download CWM from here. Pick the correct version for your device in the “download recovery” column. The file will be named something like recovery-clockwork-VERSIONNUMBER-mako.img
- Move the recovery-clockwork-VERSIONNUMBER-mako.img file into the c:Androidandroid-sdkplatform-tools folder on the computer.
- On the computer, navigate to the c:Androidandroid-sdkplatform-tools folder. Right click inside the folder and choose “Open command window here”
- At the command prompt, run: adb reboot bootloader
- Your phone should reboot into a screen showing a green android with his chest open. At the command prompt, run: fastboot flash recovery recovery-clockwork-VERSIONNUMBER-mako.img
Obtaining root access
Last step. Here we actually run the rooting tool. Everything up to now has been preparing the phone to be able to do this.
- Once the previous “fastboot flash recovery” command’s execution is complete, choose “recovery mode” again on the phone.
- You should now see a new recovery menu. Select “install zip from sd card” and then “choose zip from sd card.”
- Navigate to the SuperSU.zip file you copied over, and select “yes” to install it.
- Once that is complete, navigate back to “reboot” to reboot your phone.
- You may see a message like “Root Access Possibly Lost. Fix? THIS CANNOT BE UNDONE” or like “ROM may flash stock recovery on boot. Fix? THIS CANNOT BE UNDONE”. Choose “yes – disable recovery flash” or “yes – fix root” to make CWM recovery permanent. Otherwise, Android will try to overwrite it on reboot.
- Congratulations, the phone is now rooted.
Once rebooted, you should see the SuperSU app on your phone. Try downloading and using a powerful rooted app like Titanium Backup from the Google Play store to verify root access is working properly. Now you can do cool stuff like pattern unlock your encrypted phone.


